I found this recipe on Pinterest, but decided to change it up to our liking. You can view the original pin here. What I like most about this recipe is that it is simple enough that anyone can make changes to it according to their own likes and dislikes. It is a basic recipe that will allow you to experiment in the kitchen.
.jpg)
Ingredients
- Ice Cream Sandwiches (10)
- Chocolate Fudge
- Whipped Cream
- Crushed Oreo cookies
- Meatloaf Pan 9 x 5 x 3
- Wax or Parchment paper (for lining)
- Saran Wrap (to cover)
***The fudge can easily be changed..think Nutella, fruit spread, peanut butter, chocolate syrup, fat free, sugar free, etc. The possibilities are endless. I personally like the fudge...can you tell I'm trying to channel my love for a DQ cake? (I know my Mom is especially going to enjoy this cake.)
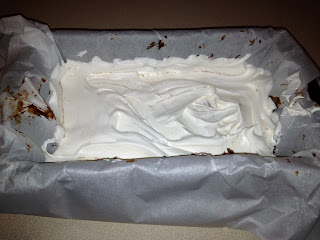
Line your pan with the Parchment paper, or wax paper. It is easier if you line it so that you end up with two big flaps on both sides of the pan. The flaps will come in handy later. In the picture my flaps are tucked under the pan..out of my way.
You will want to slice about a 1/4 inch of the sandwiches off at one end.
Meanwhile, have a helper crush your Oreos. If you don't have a helper I would recommend doing this step first, so your ice cream does not melt. We placed a handful of Oreos in a large Ziploc bag, and my son whacked them with a lemon press until they were good and crumbled. As you can see in the awesome action shot below. Make sure you put something under the bag to protect your countertops. I used a folded linen napkin.
(reward your helper with the sandwich ends you just cut off in the step above)
Now you want to line the pan with the sandwiches. Making sure they are firm, and flat on the bottom.
Next, you will take a small icing spatula and spread the fudge evenly over the sandwiches. You can use as little or as much as you like.
Next, you will spread a layer of whipped cream over the fudge.
Generously sprinkle the crushed cookies over the whipped cream. Next time I make this I want to try crumbled brownies instead of the cookies. I think that may bring me even closer to the homemade DQ cake.
Now that you have your first layer, repeat the same steps again to form the second layer.
Your finished product should end up looking something like this..
Once you have all the layers complete you want to take the flaps on both sides and gently fold them over..covering the top of the dish.
Tightly, wrap saran wrap around the pan. I wrapped it long ways all the way around two times, and then twisted it.. and wrapped it the other way 2 more times. You want to make sure it is sealed tightly enough that air is unable to get in...thus causing freezer burn. You will now place the pan in the freezer for at least one hour, or up to one week.
Before serving remove all plastic wrap, and unfold the "flaps" of paper. Firmly holding the two flaps...using them as handles to help you lift the cake from the pan placing it onto a serving dish. Generally, I remove the paper setting it aside, so I can use it to store the remaining dessert in the freezer.
Doesn't this look wonderful!!??
Now, slice...serve..and ENJOY!
As always please feel free to leave a comment. If you decide to use this recipe, and make your own changes please share the changes. I love trying new things. I can't wait to hear how this ice cream cake turned out for you.
Thanks for stopping by!
Carrie

.jpg)
.jpg)
.jpg)


.jpg)

.jpg)
Carrie, this looks and sounds so good! I think I'll for sure have to try it sometime soon!! :)
ReplyDeleteThis looks so yummy!!
ReplyDelete